Click Here For Free World Fitness Magazine Subscription
How to Make Wooden Gym Equipment
If you are the type of person that has created anything from wood, whether it was just putting up shelves for your mom when you were a kid or you have a drill and a wood saw in your garage doesn’t really matter. Making wooden home gym equipment is a simple step by step process that only requires a little foresight and some effective time management skills.
You should start with something simple and easy to use, not so easy to build because it requires precise measuring and cutting, but a plyometric box to improve your explosive strength is a good start. We will not be going into the specifics on exactly how to build a plyometric box but we will briefly list the range of possibilities of gym equipment that can be built using tools that you probably have at home lying around in your garage.
From building your own wooden rowing machine to a power rack and bench-press with grips to hold the weight, the choices that you can select from on how to build wooden gym equipment is only limited by your imagination. You will find drawing plans as well as instructions online on exactly how to construct any piece of wooden gym equipment for about 10% of the commercial price.
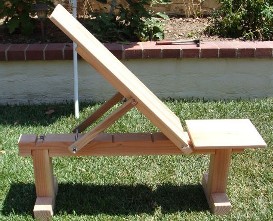
But the plyometric box and power racks are just a few of the many different choices you have on what piece of equipment of wooden gym equipment you want to build. Faced with these choices you should start with something that you will be using every time you train at home, which would be your bench because it can be easily doubled as a simple adjustable patio bench.
The materials you are going to need are 4 ft. of 3/4 x 12 piece of straight solid wood or plywood. 3 ft. of 1 x 2 wood, 8 ft. of 2 x 2 wood, 8 ft. of 4 x 4 wood post, 1 (#10) 8" bolt and nut, 2 (#8) 3" bolt and nuts, 1 (#10) 12" bolt/screw and 4 bolt and nuts, 8 (#10) nylon washers, 14 (#10) flat washers, 4-3-inch-long lag screws, 4 rubberized feet, nails and wood glue.
To complete the job, you are going to need the following tools: Circular saw, Miter saw (optional), Power drill with a few drill bits and a Forstner bit used for the counter sinking of lag screws, Wood chisel, Socket wrench/ pliers, Hammer, Sander or some sand paper.
1. Cut all wood the pieces of wood to proper lengths: 1 x 12”X14”, 1 x 34”X3/4 X 12”, 2 x 30” 2 x 2, 2 X 16” 1 x 2, 1 x 45” 4 X 4, 1 x 14” 4 X 4, 2 x 12” 4 X 4.
2. You should start by making a dado joint to join your bench wooden base to the legs using a circular saw and making multiple passes so that you can remove all the unneeded wood, then finish it up with your wood chisel.
3. Using wood glue join all the joints and then secure it using a lag screw. You should countersink the head of the lag screw so it is flush.
4. Drill a hole through the one end of 2 x 2 wood you have cut, the hole should accommodate a #10 bolt, this is going to be used for your adjustable backrest support. You then drill a hole through the side of your bench top support.
5. Using your #10 8" bolt and nut to secure the adjustable backrest support against the bench top. Place a nylon washer between each metal flat washer so that it minimizes friction.
6. Do the same thing with your swing arm.
7. The #10 12" bolt is then secured to the end of your swing arm using 4 bolt nuts.
8. This swing arm support is where your rest while using the bench. You can select to eliminate some notches which will limit the angle that the back support can be adjusted.
9. Fasten your 12”X 14” bench seat and your 34”X3/4 X 12” backrest using both nails and some wood glue then remove rough edges.
10. It’s a good idea to use rubberized feet so that your bench will not slide during use.
For more great build your own exercise equipment ideas checkout Fast & Easy Home Gym Plans
Health | Weight Loss | Exercise
Fitness Magazine | Articles | eBooks | Store | Personals | Forum | Contact
Click Here For Free World Fitness Magazine Subscription
DISCLAIMER: The material on this site is for informational purposes only and not intended to replace professional, medical recommendations or common sense. This site, owners and employees accept no responsibility for injury or damage arising from the use or misuse of the information provided..